
Importance of Mortar Matching
Mortar matching is by far the most important aspect in masonry repair and historic masonry preservation. In
fact, the importance of matching the existing mortar could not be overstated.
The mortar used has more than one function. The primary use of mortar is to form and hold the masonry units or bricks together, but
this is not the only job for the mortar to perform and is why mortar matching is so important.
The mortar is designed to breathe or repel water in both the composition and shape of the mortar, but it is also designed to be softer
than the masonry units that it bonds to protect them from damage.
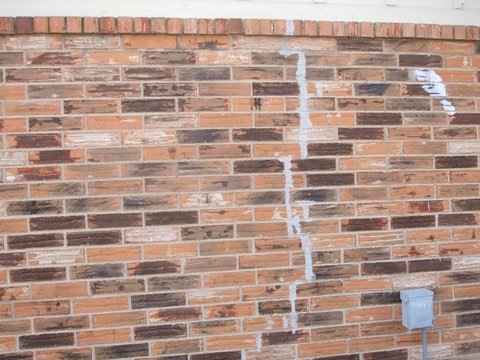
When the mortar is not properly matched to the existing mortar, it can and will most likely damage the bricks and result in deterioration and mold,
and will not bond to the existing mortar resulting in cracks, broken bricks, and loose mortar. Additionally, as the mortar color is a direct result
of the composition including the sand, it may be difficult to match mortar color without mortar matching services.
We provide mortar matching services across the U.S.
call:
(817) 366-8376
*AMR Labs*
1525 Corona Dr.
Granbury, TX 76048
Or email us:
mortarlab@gmail.com
Mortar Matching
Mortar matching is
far more than just matching the color of the existing mortar. Many local masonry repair companies focus their
efforts on getting a close mortar color match.
Mortar Color Matching
Mortar Color Matching is done through a process of blending the grey and white tones of mortar to match the base tone of mortar color,
and adjusting the other tones with pigments to get a close mortar color match. While this is on the right track, it is not how to match mortar
or mortar color.
The color, texture, and compressive strength of mortar are the result of the sand and binding materials used and in what proportion.
The sand aggregate being roughly 2/3 or 3/4 of this composition, will have a significant impact on mortar color, mortar texture, and
definitely change the
compressive strength of the mortar.
The amount of binding material verses the amount of sand will effect the compressive strength, water
absorption, and the amount of the sand color to show through.
The type of binding materials and their proportions changes the color, compressive
strength, water absorption, and the ability to bond to existing mortar.
If the mortar is not matched in composition, it is not going to match
the existing mortar color correctly, will not age with the existing mortar, will not bond to the existing mortar, it will pop loose or crumble and
can damage bricks.
Mortar Matching Analysis
Matching the mortar color is only a small part of mortar matching. Mortar matching requires an analysis of the existing mortar composition to
identify the size, color, and shapes of sand used, the types of binding material used, how much of each binding material, how much sand, and the
compressive strength of the mortar. Then the grey and white tones of binder can be adjusted and pigments as needed. This is the only way to match
existing mortar.
Mortar Matching Services
Mortar Matching Services start with some form of analysis of the existing mortar sample to determine the compressive strength,
the color, size, and shapes of sand used, and the mortar type or binding materials used and in what proportion. However, not all
mortar matching services provide mortar color matching services in addition to their composition analysis and composition matching service.
We are one of the few mortar testing labs that offer color matching for your brick mortar.
Mortar Composition Matching
Mortar Composition Matching is generally performed using one of two common methods for mortar analysis, a sand sieve analysis, and a test of
mortar compressive strength.
Mortar Matching - Compressive Strength
When matching mortar, it is important to match the compressive strength of the existing mortar to prevent damage to the bricks and ensure
bonding compatibility between the mortars. The testing method for testing compressive strength of mortar is the astm C-109 compressive strength
test. This method allow the plates of the compression device to pivot to equalize pressure on odd shaped samples, and to accurately meet this
tests requirements, the sample must be two inches on at least one side. We quite often have to work with smaller samples when matching mortar.
Mortar Matching - Matching Sand
Mortar matching cannot be done without matching the sand. The sand changes so many things in the performance of mortars, and determines major tones
in the color. The test for matching the sand is performed after the sand has been cleaned in acid to remove the binding materials, and can be done
two ways. The basic analysis of sand is a sand sieve analysis which separates the particle sizes by sifting through screens, and collecting the
weight by percentage on each screen. Then the sand is inspected to determine the color and shapes of particles. As seen in the astm C-1324 and
C-295m or modified, the sand may be inspected through a spectrographic microscope to determine the types of aggregate also.
Mortar Matching - Acid Digestion
The basic acid digestion method of mortar analysis for mortar matching is the most common and affordable method for matching mortar.
This test is used in the astm C-295 mortar analysis and our
proprietary testing method for mortar matching.
Mortar Matching - Spectrographic
The second most common test for matching mortar is a spectrographic analysis of the mortar sample. This is a much more expensive test, and is limited
by the field experience (in masonry) of the lab tech performing the analysis. While the lab may have plenty of experience identifying elements and
fibers, their understanding of why something is being seen may limit their ability to accurately interpret the results. For instance, products are
added to the mortar during cooler weather to increase the chemical reaction and help the mortar set faster without freezing, and others in hot dry
weather to hold moisture longer to slow these reactions and extend workability. Without
knowledge of the climate the day of construction, and experience
using them, these results can be misleading and result in mortar that will not set and freezes or sets too quickly and crumbles.
Matching Brick Mortar
Matching Brick Mortar is often the most difficult part in masonry repair and historic masonry preservation projects, and is often not performed
by a qualified lab. This is why you see so many repairs done that stand out and tend to crack again. This is less common in historic masonry repairs
because they generally are required to meet the governing standards of how to do masonry repairs correctly. This is not the case with most residential
masonry repairs. Often the privately owned structures don't get the same care because most owners are unaware of these standards and rely on the
contractors to know how to do masonry repair with properly matching brick mortar.
However, in most areas, there are not licenses or other restrictions on masonry repair companies, nor the ability to regulate them. There are too many
repair companies and far too many locations for them to be working at on any given day that make it impossible to keep track of how they are matching
brick mortar or even where they are working. Where historic properties are listed in a registry and the owners are required to follow
certain guidelines
for maintenance in order to remain in the registry, they are advised of the proper method to matching brick mortar, and don't get caught by the lack of
knowledge in the industry. We can only hope that more masonry repair companies become aware of this mistake and start matching brick mortar correctly
with mortar analysis and mortar matching methods.
When it comes to matching historic mortar, the mortars tend to be much softer and may contain historic lime or even natural cement. Historic
mortar types are historic lime mortar, natural cement, type K mortar, and type O mortar. Two things to watch for in historic mortar are natural cement
and historic lime. Not all historic mortars contain historic lime, and many use natural cement. Some historic mortars tend to use plant fibers (local grasses)
and animal hair (generally horse hairs) to help bind the mortar together. These are the most common historic mortars, but many other materials were used
to give mortars different properties.
Matching Historic Lime Mortar
Historic Lime Mortar has a compressive strength around 75 PSI. This does not mean that the mortar contains historic lime. You may find historic lime in
any historic mortar. Historic lime is just a larger particle size of lime where it tended to be slacked on site and they didn't always have fine screens
if any at all. As these mortars are so soft and have to absorb co2 from the air, when air flow is restricted, they tend to crumble.
Matching Natural Cement Mortar
Natural Cement has a compressive strength around 400 PSI. It is made from a natural
occurring mix of clay and soft lime within a certain range of proportions.
Due to this range, there are inconsistencies from one to another and within the same batch. This causes
inconsistent crushing pressures in the samples tested
and helps us identify natural cement. These mortars tend to have larger more
noticeable lime particles or clumps of unmixed lime giving the appearance of historic
lime. Natural cement has properties that make it beneficial in moist environments or water, as it does not absorb as much water while remaining less ridged as
a Portland base mortar with similar water penetration. For this reason, natural cement are primarily used in
aqueducts and costal regions and areas with high
moisture with severe freeze-thaw conditions.
Matching Type K Mortar
Type K Mortar has a compressive strength around 150 PSI. Type K mortar contains Portland cement and reduces water penetration,
increases compressive strength,
and produces its own co2 allowing the mortar to remain ridged when air flow is reduced.
Matching Type O Mortar
Type O Mortar has a compressive strength around 350 PSI. Like type K mortar, type O mortar contains Portland cement to achieve the same results. It just has
a little more Portland cement and a little less lime in the mortar mix. This allows type O mortar to set faster and in cooler environments, reach a higher
compressive strength, and better repel water.
Historic Mortar Matching
With any of these historic mortar types, you may see historic lime particles, and the shapes of the sand particles can increase or decrease the
compressive strength and water penetration. For this reason, you will need to get a full analysis of the mortar and sand for proper historic
mortar matching.
Matching historic mortar is a detailed process of testing samples of the existing historic mortar. To match a historic mortar, the new mortar must
match the historic mortar type, and match the sand used in the historic mortar. In matching historic mortar type, you have to match the binding materials,
match the proportions of binding materials to each other, match the proportion of binding materials to sand, match the compressive strength, and match the
sand used in the historic mortar. Then, if needed, you can match historic mortar color with pigments. With most historic mortar matching, there are not
pigments used, as the color tends to be a result of the mortar composition with mild tones of mold or mildew, but in some areas, local contaminates like
coal or coal oil may have stained the mortar to a point that staining is needed to match the existing mortar color.
Historic Mortar Matching
During the process of matching historic mortar, the sample is physically examined. This
examination of the sample uses magnification to get a better view
of the particles as needed, and notes are made for samples size, plant fibers, hair, pigments, and contaminates, and indications of
possible repairs or
different mortar types in the sample. If there is a noticeable repair or different mortar type, the sample is separated and may need tested separately to
collect details about each for more reliable historic mortar matching.
The next step in historic mortar matching is an analysis of the compressive strength. We generally test multiple pieces of the mortar to confirm
consistent
results of the compressive strength of mortar if we have multiple pieces in each sample. The measurements of each piece taken in the previous step of historic
mortar matching are used to get an accurate PSI.
Testing Crumbling Mortar
Crumbling Mortar is not a problem in historic mortar matching. We have to crumble the historic mortar sample for the rest of the mortar matching process.
If you have a soft mortar or crumbling mortar, try to get some pieces that are larger, and package the samples for shipping to protect the solid samples.
However, if no solid pieces are available, we can still perform historic mortar matching with accurate results to produce a formula for new mortar. We just
will not have the compressive strength to include in your report, but you will already know the compressive strength is very low, and the likely composition
is lime and possibly hair or fibers.
After the mortar sample is crushed, the sample is examined again to see particles that may not have been
visible before, and the weight of the sample
is collected for later in the historic mortar matching analysis. Some of the things we are looking for at this point of the historic mortar examination
are historic lime particles, larger aggregates, hairs and plant fibers, and reactive aggregates. These reactive aggregate include crushed shells that
will dissolve in the next step of the historic mortar matching analysis and will be seen in the total weight loss. As we use the weight loss to assist in and
confirm proportions, we need to identify the percentage that may be lost in reactive aggregates to more accurately interpret the later results of the
historic mortar analysis. Additionally, these notes need to be made to the sand description for matching the sand used in the historic mortar.
Acid digestion is the next step in historic mortar matching analysis. The mortar sample is
dissolve in a solution of acid to breakdown the binding materials. For
gypsum mortar, the acid solution must be heated before it will react. There are many details collected during the acid digestion process for historic mortar
analysis including the strength of reaction, color of reactions, size of the bubbles, amount of gas released, and time taken to
dissolve the sample. Generally,
the higher amount of Portland cement in the mortar sample, the longer the sample takes to
dissolve and is a slower reaction, and results will be similar for
natural cement.
At this point in historic mortar matching, the sample is rinsed clean to leave just the sand, and the sand sample is set to dry. When the sample is finished
drying, the weight is collected again, and the sand is examined. During the examination of the sand for historic mortar matching, the sand is poured into a
stack of sieves and shaken to separate the sand by particle size. Each sieved sand sample is weighed and examined to determine the color and shapes
of aggregates and the percentage by weight of each size sand particle, and notes are made for the description and gradation of the sand used. This will give
you an idea of where the sand came from and if it was intentionally graded for particle sizes. Often, with historic mortars, you will find that matching the
sand for historic mortar matching is a little different as the sand generally came from the site or the nearest creek bed while the water was down or dried up.
After collecting all the data available about the mortar sample, it is time to do the calculations and interpretation of results for a historic mortar match.
The weight loss is determined and the percentage weight loss is noted. Then, all of the information is evaluated for possible results, and narrowed to a final
interpretation through calculations. This part of historic mortar matching analysis gets very technical, but in the end, there is only one formula that will have
the compressive strength using the size and shape of sand recovered, the weight of binding materials, reaction time, and ratio of binding materials to aggregate.
This process generally is finished within two weeks from the time we get the samples to finalizing the report with a formula for historic mortar matching.
After the analysis of mortar samples for historic mortar matching is completed, and a formula is provided, we can make minor adjustments to match the
mortar color, but with most historic mortars, color matching is not necessary. Very few need adjustment from the formula to match properly.
From the formula for historic mortar provided by the analysis and the adjusted formula for color if needed, we can make custom matched historic mortars
for your repairs. However, we do not currently have a supplier of historic lime if your formula calls for historic lime particles. We can recommend places
to get your mortar made if you need the historic lime, but for many, type S/SA lime is what you will need and we can make bags of matching historic
mortar for your project.


